
Last Updated on March 14, 2024 by Michael Morten Sonne
Customer Lockbox is a security feature in Microsoft Azure that helps customers to maintain control over access to their data stored in the Azure cloud platform. It allows customers to approve or deny access to their data by Microsoft support engineers who need to access it for troubleshooting or maintenance purposes.
Here are some of the key features of Customer Lockbox in Azure:
- Control: Customer Lockbox gives customers the final say in granting or denying access to their data. When a Microsoft support engineer requests access to a customer’s data, the request is sent to the customer for approval. The customer can either approve or deny the request, depending on their security policies and compliance requirements.
- Transparency: The Customer Lockbox process is transparent, meaning that customers can see exactly who is accessing their data and why. Customers can review the access request and the justification provided by the Microsoft support engineer before granting or denying access.
- Auditability: All access requests and approvals are logged and audited, providing an audit trail for compliance purposes.
- Time-bound access: The access granted through Customer Lockbox is time-bound, meaning that access is only granted for a specific period of time. Once the access period expires, the Microsoft support engineer must request access again if they need to troubleshoot or maintain the customer’s data.
- Granularity: Customer Lockbox allows customers to grant access to specific resources, such as virtual machines or storage accounts, rather than granting access to their entire Azure environment.
How to activate it?
To activate Customer Lockbox in Azure, you need to follow these steps:
- Sign in to the Azure portal with your Azure account credentials.
- Navigate to the Customer Lockbox for Microsoft Azure portal.
- Under Administration, click on the “Enable/Disable Tenant” button.
- Changes is now set.
The direct link is here, and Enabling Customer Lockbox will apply to all in-scope Azure offerings. To find the list of supported offerings, please visit the link

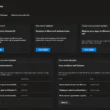
Once you’ve enabled Customer Lockbox, any access request made by Microsoft support engineers for your data will require your approval before access is granted. You can view and approve or deny the access requests from the Azure Portal.
How to use it?
To use Customer Lockbox in Azure, you need to follow these steps:
- When a Microsoft support engineer requests access to your data, you will receive a notification email from Microsoft. This email will contain information about the request, including the reason for the request and the resources that the support engineer needs access to.
- Log in to the Azure portal with your Azure account credentials.
- Navigate to Customer Lockbox for Microsoft Azure.
- Under Pending Requests, select the request you need to approw or deny.
- Review the access request details provided by the support engineer.
- If you agree to grant access, click on the “Approve” button. If you do not agree, click on the “Deny” button.
- If you approve the access request, the Microsoft support engineer will be able to access the requested resources for a specific period of time. Once the access period expires, the support engineer will need to request access again if further troubleshooting or maintenance is required.
- If you deny the access request, the Microsoft support engineer will not be able to access your data.
By using Customer Lockbox, you can maintain control over access to your data in Azure while still allowing Microsoft support engineers to troubleshoot and maintain your Azure services.
Overall, Customer Lockbox is a powerful security feature in Azure that helps customers to maintain control over their data while also allowing Microsoft support engineers to troubleshoot and maintain Azure services.