

Last Updated on February 22, 2024 by Michael Morten Sonne
Table of Contents
Intoduction
In Public Preview as this post is written
This is part 2 and is about how to setup and install the Global Secure Access clients – see the next parts for more.
This is the next part – if you not have seen Entra ID – Global Secure Access Client – Part 1 now, check it out!
In an era defined by the dynamic nature of work, where teams operate across diverse locations, the need for secure and efficient connectivity has become paramount. Microsoft’s Global Secure Access emerges as a game-changer, revolutionizing the landscape of secure connectivity. In this introduction, we’ll explore what sets Global Secure Access apart from traditional VPNs and how it seamlessly integrates with Microsoft Entra ID to elevate the standards of network security and controll access to resources.

Prerequisites
The preview requires a Microsoft Entra ID P1 license. If needed, you can purchase licenses or get trial licenses. To use the Microsoft 365 traffic forwarding profile, a *Microsoft 365 E3 license is recommended. After general availability, Microsoft Entra Private Access and Microsoft Entra Internet Access might require different licenses.
*I’m unclear about the the information behind this suggestion, but we can speculate that it might be a feature exclusive to Microsoft 365 Apps for enterprise or so in the future?
I hope it remains inclusive of the Business Premium license to for many SMBér! 🤞
Administrators who interact with Global Secure Access preview features must have the Global Secure Access Administrator role. Some features might also require other roles.
To follow the Zero Trust principle of least privilege, consider using Privileged Identity Management (PIM) to activate just-in-time privileged role assignments.
Windows client device with the following configuration:
- Windows 10/11 64-bit version.
- Microsoft Entra ID joined or hybrid joined.
- Internet connected and no corpnet access or VPN.
Deployment
Here are the essential steps for the setup
- Activate Global Secure Access for the tenant (if not already done).
- Enable the profiles you will use – etc. Private Access Profile.
- Establish security profiles and web content filter rules.
- Install the Global Secure Access Client.
- Integrate with Conditional Access (this will be covered more in an opcomming part also).
Microsoft Entra admin center
Discover the power of Global Secure Access, your centralized hub within the Microsoft Entra admin center for configuring and managing Microsoft Entra Internet Access and Microsoft Entra Private Access.
Go to https://entra.microsoft.com and exploring the features and capabilities that Global Secure Access has to offer. Elevate your network management experience with Microsoft Entra – your key to a secure and efficient digital workspace!

Activation of the features in Entra ID
The initial step is to activate the feature in your tenant, a process you perform through the Entra admin portal. Navigate to Global Secure Access (Preview) > Get started, and simply activate the features you want to use!
Session Management
To utilize the features in Conditional Access and Identity Protection from Entra ID, you need to enable Adaptive Access in the Session Management settings under the Global Settings.
Once activated, Global Secure Access signaling facilitates client IP restoration, utilized by Conditional Access, Continuous Access Evaluation, Identity Protection and Microsoft Entra ID sign-in logs. That is smart and a nice feature! 😎
These signals offer network location details, allowing you to establish policies restricting user access to specific apps based on their utilization of Global Secure Access via the GSA client or a remote network. Optionally, you can enable Tenant Restrictions simultaneously, although we won’t be exploring that feature today..
When considering the utilization of the Global Secure Access solution to prevent various types of attacks, such as AiTM, or merely for accessing specific resources, the key is to ensure that the solution is employed for accessing these diverse resources secure.

Please note: To verify that it is activated successfully, check that a All Compliant Network Location is added as a named location under Entra ID > Protection > Conditional Access > Named locations
Here is a direct link: Conditional Access – Named Locations – Microsoft Entra admin center
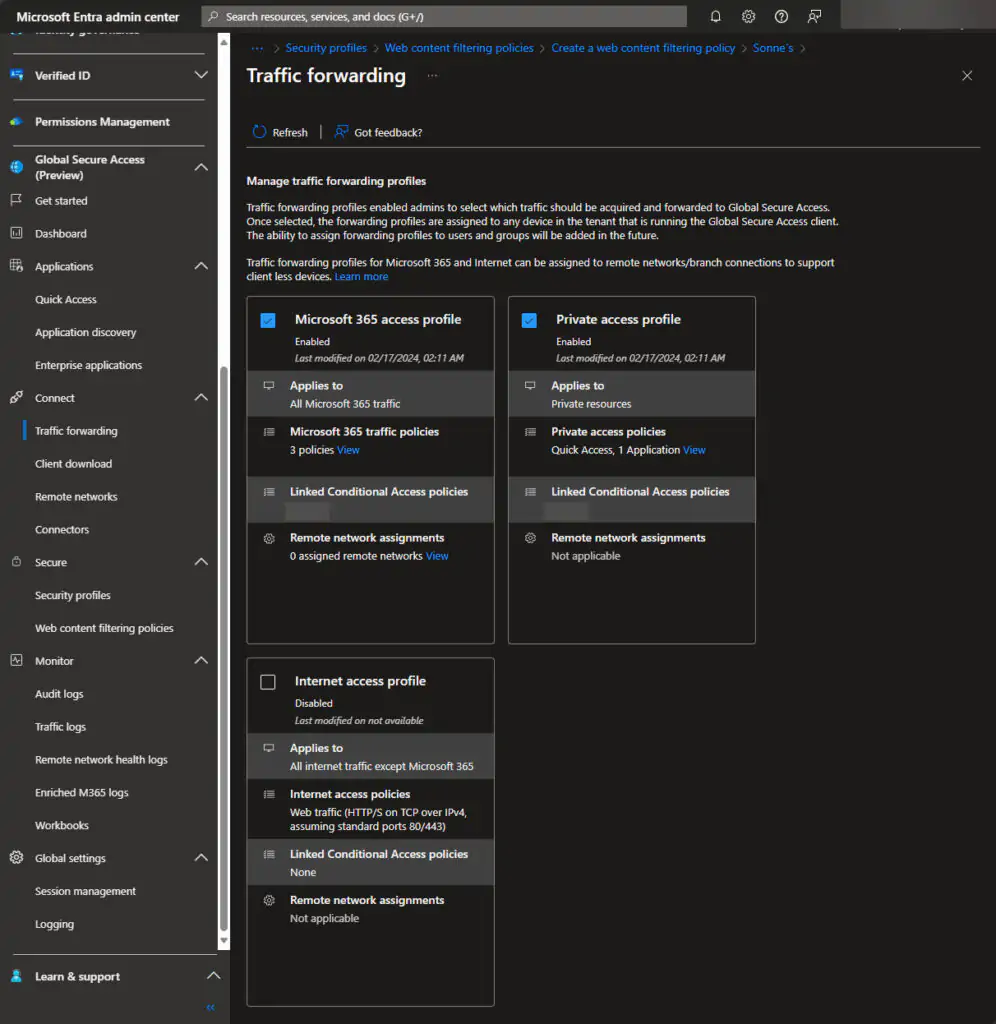
Types of profiles
Differentiated handling can be implemented for traffic originating from three types of applications or resources, each having its own set of use cases.:
- Microsoft 365 – encompassing all traffic directed to the Microsoft network endpoints.
- Private Access – involves managing traffic directed to on-premises hosted applications, akin to the traditional application proxies you may know about.
- Internet Access – including traffic to any other network or the internet.
Global Secure Access clients
The Global Secure Access Client empowers organizations to manage network traffic on end-user devices, enabling routing of specific traffic profiles through Microsoft Entra Internet Access and Microsoft Entra Private Access. This strategy provides enhanced controls such as continuous access evaluation (CAE) (yes, that is nice!), device compliance checks as a part of Conditional Access in Entra ID and Intune, or the implementation of multifactor authentication for resource access (I will hope you will use this part! 😂)
A smart feature is available to control access to valuable resources. Here, I recommend you to utilizing the Conditional Access authentication strength in Entra ID. From here administrators have the capability to define the level of authentication required for accessing a resource through the creation of a Conditional Access policy using the Require authentication strength control.
There are three predefined authentication strengths to choose from:
- Multifactor authentication
- Password + something you have
- Temporary Access Pass (One-time use AND Multi-use)
- Microsoft Authenticator (Phone Sign-in)
- Certificate-based authentication (Multi-Factor)
- Windows Hello for Business
- FIDO2 security key
- Passwordless MFA
- Microsoft Authenticator (Phone Sign-in)
- Certificate-based authentication (Multi-Factor)
- Windows Hello for Business
- FIDO2 security key
- Phishing-resistant MFA
- Certificate-based authentication (Multi-Factor)
- Windows Hello for Business
- FIDO2 security key
In the upcoming period, Entra ID will introduce the new Passkey. Explore further details about it: What’s new? Release notes – Microsoft Entra | Microsoft Learn
Beginning of January 2024 or so, Entra ID will support device-bound passkeys stored on computers and mobile devices as an authentication method in public preview, in addition to the existing support for FIDO2 security keys. This enables your users to perform phishing-resistant authentication using the devices that they already have.
Additionally, administrators can craft a custom authentication strength tailored to specific authentication method combinations they wish to permit 🔐😎
Else the clients itself is distinguished by its utilization of a lightweight filter (LWF) driver, the Global Secure Access Client stands apart from many other Security Service Edge (SSE) solutions, which typically integrate as virtual private network (VPN) connections. This distinction allows seamless coexistence with other solutions, as the Global Secure Access Client acquires traffic based on configured traffic forwarding profiles prior to interactions with alternative solutions and forwarding all the traffic!
Deploying the Global Secure Access client
In this blog is only covering the installation of the Global Secure Access Client on Windows – have not an Android phone, and MacOS and iOS is still not avalibel for all to test 😒
Deploying of the client through Intune is straightforward and easy to perform. Download the client installer from the Entra portal located at Global Secure Access (Preview) > Devices > Clients. Here is the direct link: Client download – Microsoft Entra admin center
As you can see here, Windows and Android are available for testing in the preview state for now, while access to MacOS and iOS is more restricted to early access.
The Global Secure Access Client on Windows utilized by Microsoft Entra Internet Access for Microsoft 365 and Microsoft Entra Private Access. This client captures and directs network traffic to the Microsoft Security Service Edge Solution.

Remember as you read before, the devices you install Global Secure Access on must be Microsoft Entra ID joined or hybrid joined for this to work!
Select Download client and you now have the installer you need for the next step! 😉
Via Intune
To deploy the Global Secure Access client via Intune, you need to perform some steps as listed here to get the job done – and it´s easy!😊
For creating the app in Microsoft Intune, you need the Microsoft Intune Win32 App Packaging Tool to encapsulate the installation file GlobalSecureAccessClient.exe into an .intunewin file there is the needed format to use in Intune. This process is straightforward when initiating the app packaging tool. I have a GUI wraper to the console tool I will release soon – stay turned for more information about that! 😉
Following a successful wrapping, proceed to add the app to Microsoft Intune. However, it’s essential to familiarize yourself with the installation parameters before doing this. You can run GlobalSecureAccessClient.exe /? to obtain an overview of the available parameters from your Console (Windows Terminal or so). Additionally, verify the installation process to understand the information for installation detection and validation!
Once all the information is collected, you can follow these steps to navigate through the process of adding the app to Microsoft Intune. The emphasis in these steps is on the specific details of Global Secure Access client installation.
- Open the Microsoft Intune admin center portal and navigate to Apps > Windows > Windows apps
- On the Windows | Windows apps page, click on Add > Windows app (Win32) and click Select
- On the App information page, select the created .intunewin file you just created and click Next to upload it.
- On the expanded App information page, specify at least a Name, Description and Publisher and click Next
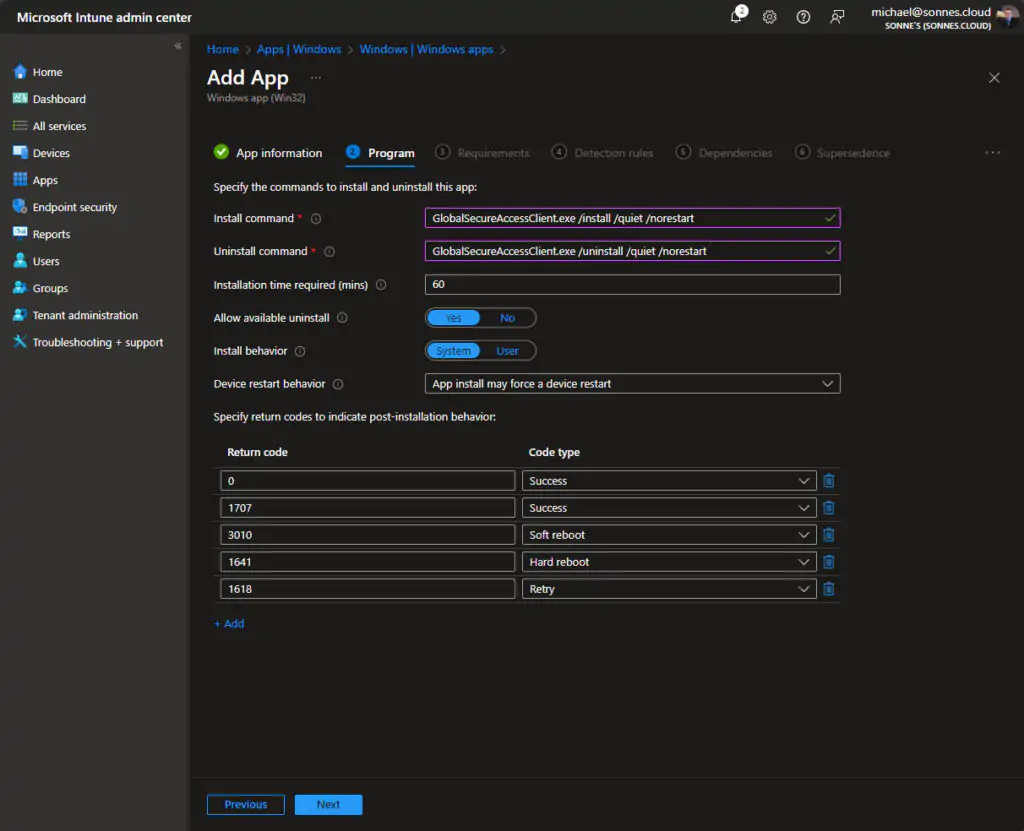
- On the Program page, as shown below in Figure 1, specify at least the following information and click Next
The options for the install arguments is as follow:
- Install command: GlobalSecureAccessClient.exe /install /quiet /norestart
- Uninstall command: GlobalSecureAccessClient.exe /uninstall /quiet /norestart
Remember that the .exe name need to be the one you converted into your .intunewin file
- On the Requirements page, specify at least your Operating system architecture and Minimum operating system and click Next
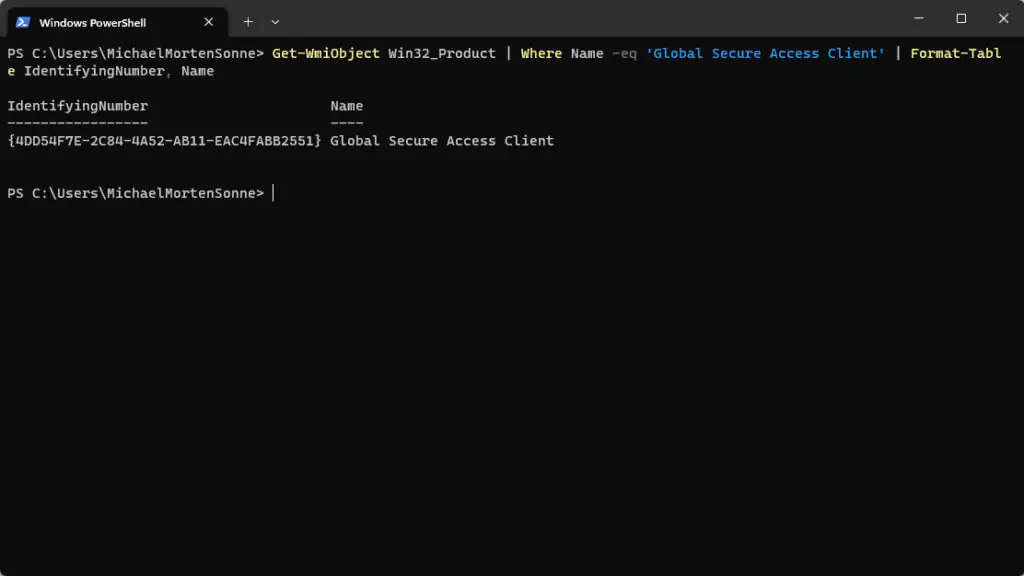
- On the Detection rules page, select Manually configure detection rules and specify the following rule and click OK and Next
- Rule type: MSI
- MSI product code: Specify {4DD54F7E-2C84-4A52-AB11-EAC4FABB2551} as the product code to detect the installation
- MSI product version check: Select No to not specifically check the version

Remember that the MSI product code changes for every version of the installer. A .MSI (Microsoft Installer) package has a unique identifier (ID).
To get the MSI Product code for the installer, you can get it via this command from a device where the client is installed on via PowerShell: Get-WmiObject Win32_Product | Where Name -eq 'Global Secure Access Client' | Format-Table IdentifyingNumber, Name
- Click OK to apply the detection rule
- On the Dependencies page you can configure any dependencies if any for the app -click Next
- On the Supersedence page you can configure this too if any supersedence relations to older versions – click Next
- On the Scope tages page configure any required scope tags if you use this and click Next
- On the Assignments page, configure the assignment to deploy the Global Secure Access client too and click Next
- On the Review + create page, verify the provided configuration and click Create
Plase note: The information in these steps is based on the Global Secure Access client version 1.7.484 im testing at the moment.
Now you are good to go, and the user can manually install the Global Secure Access client from the Company Portal, or you can install it automatically via Intune when assing the app to the Required properties in the App! 🔐🌍
Manual Install
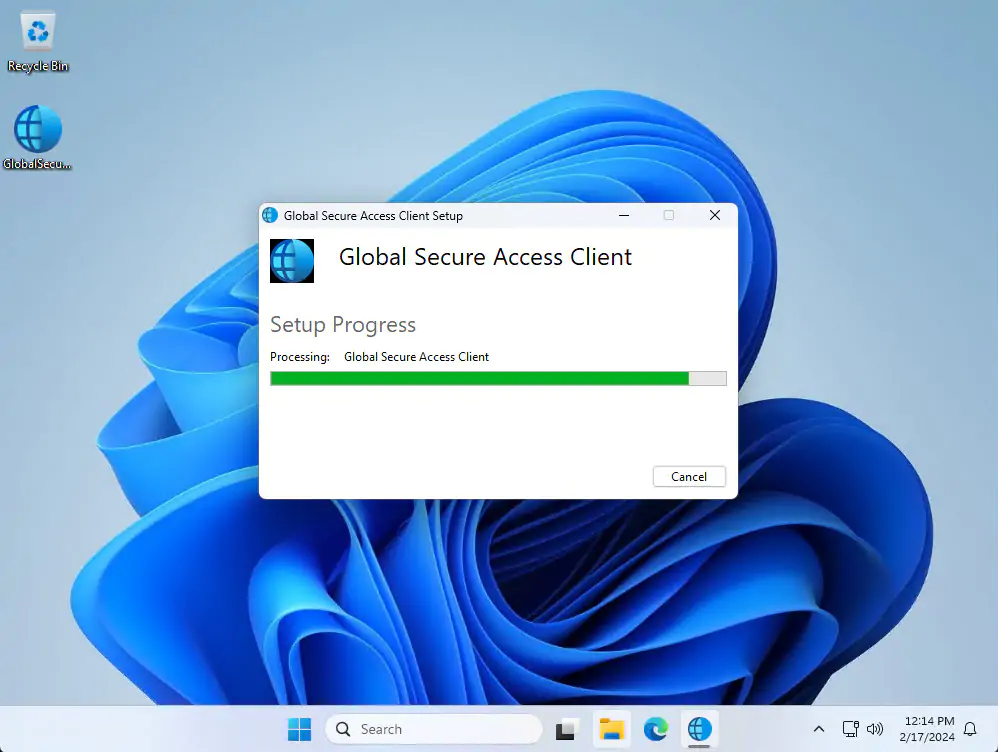
Organizations can install the client interactively or silently with the /quiet parameter.
- Copy the downloaded Global Secure Access Client installer to your client machine or download it direct on the Client.
- Run the setup file GlobalSecureAccessClient.exe. When the installer starts, Accept the software license terms and click Install.

- The installation is now started, and wait for it to complete.
If you encounter any installation problems, the installer log is located in the user’s %temp% folder. – etc. C:\Users\Michael\AppData\Local\Temp where the file names is in this prefix: Global_Secure_Access_Client_%timestamp%
- After the client is installed, users will be prompted to sign in with their Microsoft Entra ID credentials (aka Work account) as shown in the below picture:

- After a user is signed in, the connection icon turns green in the system tray and it´s now running and ready to use – and for sure the rules and profiles must be configured before we can fully utilize the complete set of protections 😉
The installed client
Whether from the desktop client or a remote network like a branch location, the installed client effortlessly acquires network traffic, providing a dedicated public internet traffic forwarding profile. Experience fast, secure, and compliant access to public internet apps while leveraging Microsoft’s identity-aware Secure Web Gateway solution.
Explore the various tray icon options available (for now) when logged in with your Entra ID credentials in the Global Secure Access Client:
After a user is signed in, the connection icon turns green in the tray, and double-clicking on it will show a small notification with client information and showing the current state – here for me a connected state.

Troubleshooting the client
To troubleshoot actions and connectivity for the Global Secure Access Client, you right-click on the client icon in the taskbar – here you will get a small menu like this:

Now what the actions are in the tray menu for the client.
- Login as different user: Log in as a different user. This forces the sign-in screen to show up to reauthenticate to another user.
- Pause: This option can be used to temporarily disable traffic tunneling. As this client is part of your organization’s security posture, I recommend leaving it running always.
Pausing the client stops the Windows services related to the client, and when these services are stopped, traffic is no longer tunneled from the client machine to the cloud service. Network traffic behaves as if the client isn’t installed while the client is paused. If the client machine is restarted, the services automatically restart with it again. - Resume: This option starts the underlying services related to the Global Secure Access Client. Use this option to resume after temporarily pausing the client for troubleshooting. Traffic will again tunneling from the client to the cloud service.
- Restart: This option stops and starts the Windows services related to the client.
Now to the diagnostics part of the tray menu.
- Collect logs: Collect logs for support and more troubleshooting. These logs are collected and stored in
C:\Program Files\Global Secure Access Client\Logsby default.
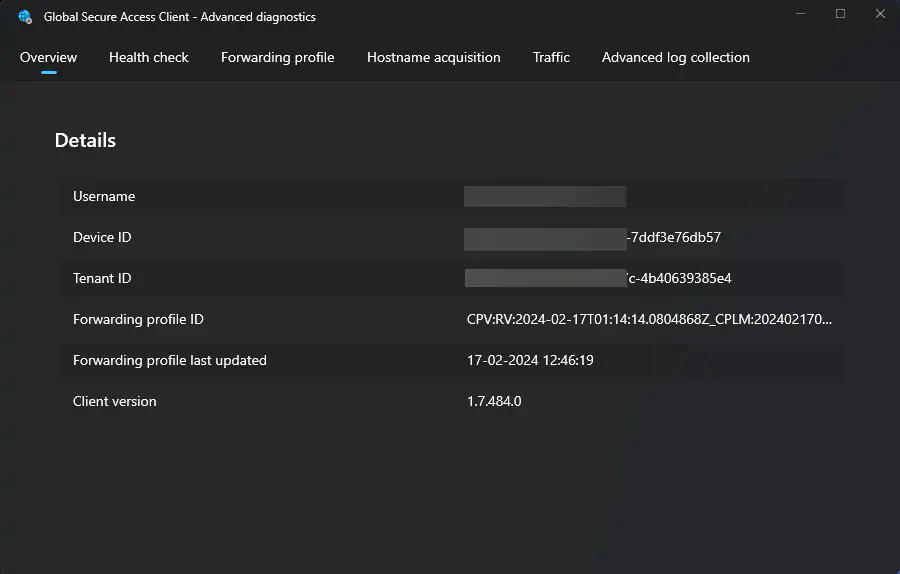
These logs include information about the client machine, the related event logs for the services and registry values including the traffic forwarding profiles applied to the client (based on logged in user) - Advanced Diagnostics: This view provides a live dashboard of client status and connections tunneled by the client to the Global Secure Access service.
Administrator permissions on the client is needed to open this part og the Client.
- Overview: shows general information about the client configuration including: logged-in user, policy version in use, last policy update date and time, and the ID of the tenant the client is configured to connect to.
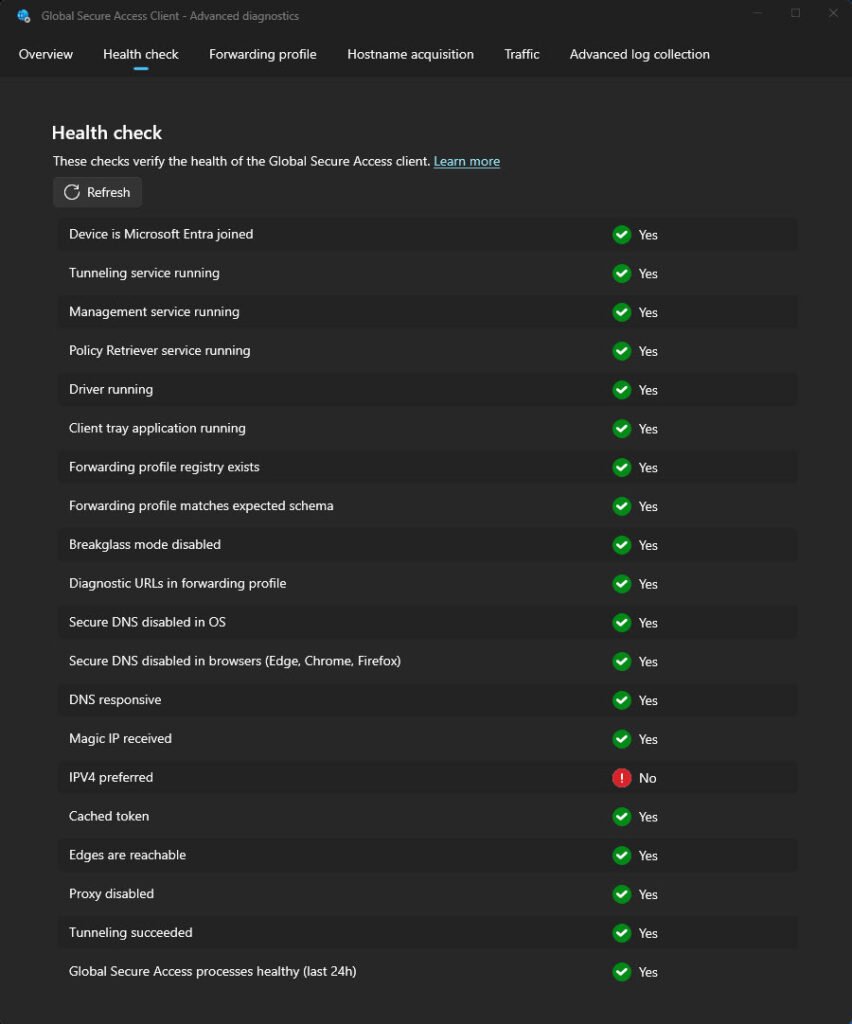
- Health check: shows information about the client configuration including: device type, services, DNS settings andforwarding profile, proxy settings and more – the list is quite long.
- Forwarding profile: shows information about the forwarding profile configuration including:profile ID and last updated timestamp (and option to refresh details) and the list of rules – shorted in profile types. The list for Microsoft 365, etc., is extensive, and it cannot be displayed here due to its size 😂
The list of rules provided here is ofc. including the Private Access rules! 🔐

- Hostname acquisition: shows a compilation of hostnames acquired by the client based on the FQDN rules within the forwarding profile. Each hostname is displayed on a separate row. If the DNS resolves the hostname (FQDN) to a different IP address in future acquisitions of the same hostname, a new row is created. Data showed is Timestamp, FQDN, Generated IP Address and Acquired from.
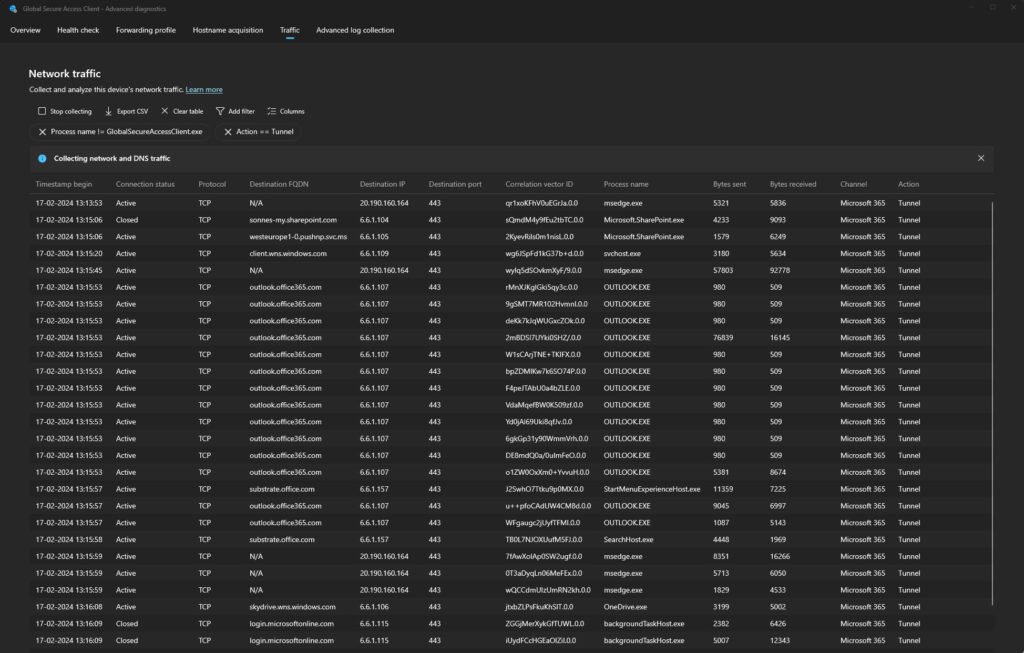
- Traffic: shows a compilation list of network traffic that the client is connecting to, aka to a modernized version of
netstat -awith additional details! 😎
Data showed is Timestamp, Connection status, Protocol, Destination FQDN, Destination IP, Destination Port, Correlation vector ID, Process name, Bytes send, Bytes received, Channel (Traffic Profile) and Action.
- Advanced log collection: shows an option to collect more detaild logs from the app and client to sent it to etc. your IT or Network administrator for diagnostics.
Event logs
Event logs related to the Global Secure Access Client can be found in the Windows Event Viewer under Applications and Services/Microsoft/Windows/Global Secure Access Client/Operational. These events provide useful information regarding the state, policies, and connections made by the client also.
Testing
Internet speed test
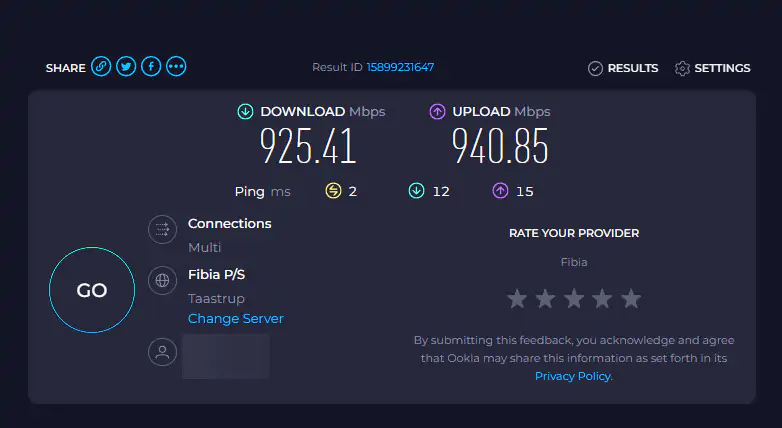
Lets explore the performance of our Global Secure Access solution with a quick internet speed test. Gauge the efficiency and responsiveness as it seamlessly connects you to your applications and resources, ensuring optimal connectivity for your digital workloads.
I have 1 Gbit internet connection (fiber) at home, and here is the test with the client active and paused.
Active
This is with the agent active and Collecting network and DNS traffic in the Advnaced diagnostic settings menu based on my rules.
*No web content filtering policy is setup, as I use Defender for Endpoint to this – active profiles is Microsoft 365 and Private Access
INFO: You cannot rely entirely on this test since it was merely a small-scale assessment conducted to gauge the impact of network traffic when the agent is running and showing debug information from the network traffic.
Paused
This is with the agent paused – so the agent is not filtering traffic and so.
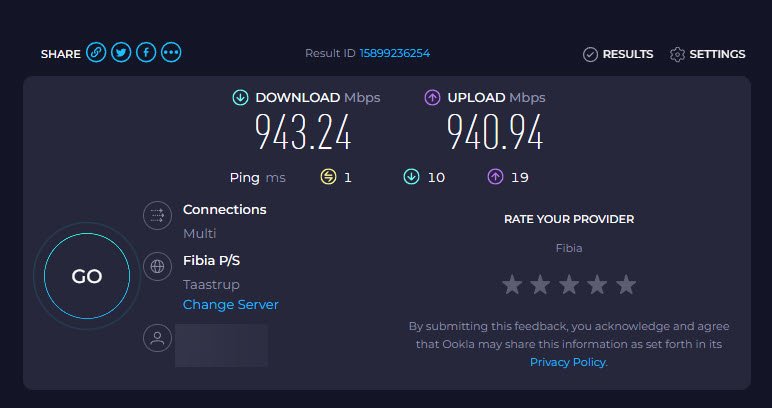
Conclution on the network speed test
There is minimal speed loss 🚀😉
Conclusion
Experience the ease of installation and activation with just a few clicks when deploying the Global Secure Access Client on Windows. The Entra admin portal streamlines the process, allowing you to enable and configure the client effortlessly. Simply navigate to Global Secure Access (Preview) > Get started, and with a click, activate the feature(s) you will test or use. This setting the stage for a seamless and secure connection to etc. Microsoft Entra Internet Access and Microsoft Entra Private Access with your On-prem applications. This hassle-free approach ensures a swift and efficient deployment, empowering your organization with enhanced network security.
Stay tuned for Part 3, where I will guide you through the activation of the features and the setup of the Microsoft 365 Profile in Global Secure Access. Uncover the step-by-step process to harness the full power of this innovative solution, ensuring a smooth and secure activation of features and effortless deployment. Don’t miss out on the practical insights that will empower you to make the most of Global Secure Access in your organization. Watch out for the upcoming details!
It’s important to note that while the Global Secure Access feature is currently in preview, and its licensing requirements may evolve as it progresses towards General Availability (GA)!
Thank you for taking the time to visit my blog. Kindly share it with others if you find it helpful for them! 😉🔐👍
Stay tuned for the new post about something cool! 🥳