
Last Updated on February 15, 2024 by Michael Morten Sonne
Table of Contents
Intoduction
It’s important to note that this is an overview of the components involved, given the extensive nature of the topic. This isn’t a comprehensive setup guide; rather, it’s a list of crucial topics that require your consideration.
Why set this up?
Configuring email authentication for domains you own in Exchange Online, including SPF (Sender Policy Framework), DKIM (DomainKeys Identified Mail), DMARC (Domain-based Message Authentication, Reporting, and Conformance), and MTA-STS (Mail Transfer Agent Strict Transport Security), is crucial for several reasons:
Email Deliverability: Implementing these authentication mechanisms helps improve the chances of your legitimate emails reaching recipients’ inboxes. It prevents your emails from being marked as spam or rejected by email servers.
Security: These authentication methods enhance the security of your email communications. They protect your organization and recipients from phishing attacks and email spoofing, where attackers impersonate your domain to send malicious emails.
Brand Reputation: By ensuring that only authorized senders can use your domain to send emails, you protect your brand’s reputation. This is especially important for organizations that rely on email communication for customer engagement and marketing.
Compliance: Many regulations and industry standards, such as GDPR and HIPAA, require organizations to implement robust email security measures. Compliance with these regulations can be achieved through proper email authentication.
What is the diffrent?
Here’s a breakdown of each authentication method and its benefits:
SPF (Sender Policy Framework):
- SPF helps to prevent email spoofing by specifying which mail servers are authorized to send emails on behalf of your domain.
- It allows email receivers to check if the sender’s IP address is authorized, reducing the likelihood of fraudulent emails and servers.
DKIM (DomainKeys Identified Mail):
- DKIM adds a digital signature to your outgoing emails, ensuring that the recipient can verify the email’s authenticity and origin.
- It prevents tampering with email content during transit and confirms that the email was sent by an authorized source.
DMARC (Domain-based Message Authentication, Reporting, and Conformance):
- DMARC builds upon SPF and DKIM to provide a comprehensive email authentication framework.
- It enables you to set policies for handling emails that fail authentication, such as quarantine or reject, and allows you to receive reports about email activity.
MTA-STS (Mail Transfer Agent Strict Transport Security):
- MTA-STS enforces secure email transmission by specifying that email servers must use secure communication (TLS) when exchanging emails with your domain.
- It reduces the risk of man-in-the-middle attacks and eavesdropping on email traffic.
And to mention, this is a small overview of the parts here, as the topic for all is big. So, this is not a complete setup guide, but a list of some important topics.
Remember to check the the RFC standards under here to read more in details, if you will 😉
Why this post now?
As a meminder for EX675941 there is out in your Microsoft 365 tenants (you need the right permissions for your tenant to read it): “Reminder to authenticate outbound email with SPF, DKIM, and DMARC”
You need to ensure this is setup for your envoiroment, as many email service providers (for example, Gmail, Yahoo!, and Outlook.com) are configured to reject messages that don’t meet email authentication standards.
Here is the stuff needed, but with 2 adds to it on top – as I think that is a good add-on too – I have the setup in place private, as im working in Security and see this for my personal brand a need.

So please check your setup – and if this is needed to setup – do it now before it´s to late! 😉
And in general, I see a lot of domains and companies where this is not setup – so here is a shot intro to why you need to set it up today.
SPF
How SPF works – Understanding the Basics
While SPF (Sender Policy Framework) records may seem complex and perplexing at first glance, they become quite comprehensible once you grasp the fundamentals. Consider this example of an SPF record:
v=spf1 a mx ip4:78.51.22.235 include:spf.protection.outlook.com include:spf.sonnes.cloud ~allThe RFC standard is here: RFC 4408 – Sender Policy Framework (SPF) for Authorizing Use of Domains in E-Mail, Version 1 (ietf.org)
Now, let’s dissect the key components of the SPF record
The “a” element:
Imagine I’m sending an email from the public IP address 78.51.22.235 on behalf of the domain “sonnes.cloud” If “sonnes.cloud” has an A record that resolves to 78.51.22.235, then this mechanism will be considered valid.
The “mx” element:
Every domain that handles email has one or more MX (Mail Exchanger) records. These records specify which email servers are authorized to relay emails. For instance, if you’re using Microsoft 365 like me and many others, there’s typically a single MX record with a priority of 0. This indicates the server where email deliveries are accepted.
The “include” element:
Let’s assume I’m sending an email from public IP 78.51.22.235, representing the domain “sonnes.cloud.” If the SPF record for “sonnes.cloud” includes the domain spf.sonnes.cloud, and 78.51.22.235 is validated against the SPF record for spf.sonnes.cloud, then this mechanism will be considered valid.
The “all” element:
The “all” mechanism serves as a catch-all. If none of the previous mechanisms match, it comes into play. In this case, it results in a SoftFail for all emails that reach this point, indicating that they are not explicitly authorized.
In essence, SPF records help ensure that only authorized sources can send emails on behalf of a domain. By understanding these fundamental elements, you can decipher SPF records and employ them to bolster email security and authenticity.
Setup SPF record
First before you can setup an SPF record for your domain, you need to decide which hosts you will set to be allowed to send e-mail from your domain. If you have done that, you can now browse to etc. a page like SPF Record Generator – MxToolBox to discover first your current SPF record and then use the wizard to generate an new record in the right format if not familier with edit records like this by hand manualy.
You can see the needed DNS records for your Microsoft 365 services here too in the Admin Portal if needed here: Domains – Microsoft 365 Administration
The SPF record is setup on your NS (Name Servers) where you hosting your DNS records for your domain(s) like CloudFlare. If you can´t remember it, you can etc. use DNS Lookup to find the NS records of your domain to see where it´s hosted – then you know where to go! 😁
For what is needed and all the records for Exchange Online etc., take a look here: Set up SPF to help prevent spoofing | Microsoft Learn
DKIM
How DKIM works – Understanding the Basics
DKIM (DomainKeys Identified Mail) stands as an email authentication technique empowering email senders to ascertain the authenticity of their messages and ensure their integrity throughout transit. Utilizing public key cryptography, DKIM appends a digital signature to each outbound email, a signature that the recipient’s email server can validate (if setup to check for this ofc. 🤣)
This verification process confirms the message’s origin from the rightful sender and guarantees its unaltered state during transmission.
The RFC standard is here: RFC 6376 – DomainKeys Identified Mail (DKIM) Signatures (ietf.org)
Now, let’s dissect the key components
Use DKIM for email authentication to:
- Boost email deliverability: DKIM reduces spam flags and rejections, enhancing trust by digitally signing your messages.
- Prevent email spoofing: DKIM verifies sender legitimacy, thwarting phishing and fraud attempts.
- Safeguard brand reputation: Ensure unaltered, legitimate messages to enhance brand trust.
- Comply with standards: Many organizations mandate DKIM, ensuring message acceptance.
In summary, DKIM is vital for better email delivery, anti-fraud measures, and brand trust.
How DKIM works
- Sender generates key pair: Sender’s server creates a public-private key pair, keeping the private key secure.
- Public key publication: Sender adds the public key to their DNS record for recipient servers to access.
- Signing outgoing messages: Sender’s server creates a unique digital signature for each outgoing email, using the private key, adding it as a DKIM signature in the message header.
- Recipient verifies signature: Upon receiving the email, the recipient’s server retrieves the public key, decrypts the signature, confirming the message’s authenticity and integrity.
DKIM thwarts email spoofing and phishing, enhancing trust and deliverability by verifying messages and deterring spam flags.
Setup DKIM record
To set up DKIM for your domain, you will need to following general steps:
- Generate a DKIM key pair: Create a public-private key pair using a DKIM generator tool or your email provider’s setup.
- Publish the DKIM public key in your domain’s DNS record: Add it as a TXT record, specific steps vary by registrar or DNS host.
- Configure your email service: Set it to sign outgoing emails using your private DKIM key, typically in your email service’s DKIM settings.
- Test your DKIM setup: Verify functionality using a DKIM testing tool or by sending a test email with a valid DKIM signature.
It’s important to note that the exact steps for setting up DKIM can vary depending on your specific email service provider, domain registrar and DNS hosting 😉
Here is an example of a record and data:
DKIM-Signature: v=1; a=rsa-sha256; c=relaxed/relaxed; d=sonnes.cloud;
s=selector1; t=31212754826;
bh=3pRwK5VjXs2Z9YfDqA7T1oB6UjJ8LmN5FqS4vV9e2Pz1=;
h=From:To:Subject:Date:Message-ID:MIME-Version:Content-Type;
b=ctj5Q5D5l+9t33GBJtA5gPS/lwqdUNcF+IjZaefFztOhJWZI+q3Yn2yKjJrukdE+I
0eNSbNgknO5j+G5KW5PQ9bId5aMz7dG+oe/W8mCgSy1M35BjZNFbFZ/8vl/LY0cJ+0
rO/F24z25R1wNfR0nU6dDeL6hF8s7sU6vvyT6MhE=
This DKIM signature includes the following elements and data needed:
- v=1: indicates the version of DKIM being used.
- a=rsa-sha256: specifies the algorithm used to sign the message
- c=relaxed/relaxed: specifies the canonicalization algorithm used for the header and body of the message there is signed
- d=sonnes.cloud: specifies the domain name that the signature is associated with
- s=selector1: specifies the selector that identifies the public key used to verify the signature.
- t=11212754826: specifies the time the message was signed
- bh=3pRwK5VjXs2Z9YfDqA7T1oB6UjJ8LmN5FqS4vV9e2Pz1=: is the body hash of the message, which is calculated using the algorithm specified in the “a” tag specified
- h=From:To:Subject:Date:Message-ID:MIME-Version:Content-Type: specifies the header fields that were included in the signature
- b=ctj5Q5D5l+9t33GBJtA5gPS/lwqdUNcF+IjZaefFztOhJWZI+q3Yn2yKjJrukdE+I 0eNSbNgknO5j+G5KW5PQ9bId5aMz7dG+oe/W8mCgSy1M35BjZNFbFZ/8vl/LY0cJ+0 rO/F24z25R1wNfR0nU6dDeL6hF8s7sU6vvyT6MhE=:
This is the digital signature for the message, which is generated using the private key of the sending domain’s DKIM key pair there will be vertified if validin the other end based on the public key – smart!
The DKIM signature allows the receiving email server to verify that the message was not altered during it´s transit and that it originated from the domain specified in the “d” tag 😁
Go to DomainKeys Identified Mail (DKIM) – Microsoft 365-security to activate it for your domains in Exchange Online (you need the right permissions)! 🙌
DKIM rotation
Automatically rotate DKIM keys for all domains with configured DKIM within Exchange Online. This small script examines the domains in Exchange Online to determine if DKIM is enabled. If DKIM is active, it proceeds to rotate the DKIM keys using the Rotate-DkimSigningConfig cmdlet.
DKIM (DomainKeys Identified Mail) key rotation is a process that involves periodically changing the cryptographic keys utilized for DKIM signatures within your Microsoft 365 environment. DKIM serves as an email authentication method, aiding in the verification that an email message has not been altered during its transit and genuinely originated from the claimed domain.
The significance of rotating DKIM keys lies in enhancing security. Prolonged use of the same DKIM key increases its susceptibility to attacks, providing potential attackers with more time to crack or compromise the key. Regularly changing DKIM keys is crucial for bolstering email security.
Is DKIM rotation safe?
DKIM rotation, when performed correctly, is a safe practice and is actually essential for maintaining email security. The primary purpose of DKIM key rotation is to enhance security by reducing the risk associated with using the same cryptographic key for an extended period.
Is Microsoft not doing this for you?
Yes they do! But Microsoft rotates the DKIM keys once a year. And you just don’t know when. Get in control and rotate your keys yourself periodically to make sure your keys change.
PowerShell can do it for you
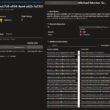
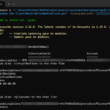
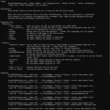
See the script hosted on my public repo on my GitHub account here: https://github.com/michaelmsonne/public
To use the script in PowerShell, run the following command:
.\RotateDKIMKeysExchangeOnline.ps1When executed, this command will generate the following output within your console if you are currently logged into Exchange Online. If not logged in, it will prompt you to do so.
DMARC
How DMARC works – Understanding the Basics
Security officers face challenges securing emails and thwarting snooping or Man-in-The-Middle (MTM) attacks. Various protocols like SPF, DKIM, and DMARC exist to safeguard email traffic online. These protocols protect against phishing and spam etc. by securing sender details (email address/domain), sending host (mail system), and email authenticity (contents). Implementing these standards involves adding records to the domain’s DNS details. Additionally, MTA-STS offers support.
DMARC (Domain-based Message Authentication, Reporting, and Conformance) is an email authentication method that extends DKIM and SPF protocols. Domain owners can use DMARC to set policies in DNS records, guiding email servers on handling messages that fail DKIM or SPF checks. This includes untrusted emails, which should be discarded. DMARC also generates reports, which you can use to understand how your email is being handled.
Reasons to use DMARC for your email authentication:
- Security: Defend against phishing and spoofing attacks, safeguarding sensitive information.
- Safeguard brand reputation: Prevent unauthorized domain use, preserving brand integrity and customer trust.
- Enhance email delivery: Reduce spam risk, ensuring legitimate emails reach recipients without rejection.
- Compliance adherence: Fulfill email security standards, meeting regulatory expectations and showcasing dedication to customer and business protection.
- Attain oversight and management: Utilize DMARC reporting to monitor authentication outcomes and resolve issues.
Implementing DMARC offers a robust layer of protection against email-based threats while ensuring legitimate communication flows seamlessly. Adopting DMARC not only fortifies email security but also bolsters trust and integrity in digital communications.
The RFC standard is here: RFC 7489 – Domain-based Message Authentication, Reporting, and Conformance (DMARC) (ietf.org)
How DMARC work
DMARC’s functioning involves checks performed by an email server upon message receipt, assessing DKIM and SPF authentication. If these checks fail, the server refers to the domain’s DNS records to apply the DMARC policy.
Key elements of the DMARC policy include:
- Policy Type: Determines if the domain owner wants reports on authentication failures (“none”), to quarantine messages for review, or reject them outright.
- Identifier Alignment: Ensures alignment between DKIM or SPF identifiers in the message header and the domain in the “From” field, curbing spoofing attacks.
- Reporting Address: Specifies where DMARC reports, detailing authentication outcomes, are sent to identify potential security issues.
Upon encountering a failed authentication, the server consults the sender’s domain DNS for a DMARC policy. Depending on the policy (e.g., “quarantine” or “reject”), the server may divert the message to the spam folder or prevent its delivery.

Setup DMARC
Define your DMARC Policy
Before delving into DMARC setup, determine the action you wish the email server to take when a message fails DMARC authentication. Options include none (receiving reports only), quarantine (label as spam), or reject (block the message). Start with the none policy for initial monitoring before escalating to more stringent policies…
Create your DMARC Record
Generate a DMARC record, a DNS TXT record containing your policy details, using etc. DMARC Record Generator – Create DMARC DNS Records – MxToolbox. Ensure the record includes essential information such as domain name, policy type, identifier alignment, and reporting address.
Publish the DMARC Record
Once the DMARC record is generated, publish it in your domain’s DNS records.
Monitor DMARC Reports
Leverage DMARC’s reporting capabilities to monitor and analyze email authentication results across your domain’s email traffic. Utilize specialized DMARC reporting tools to gain insights from these reports.
Gradually Enhance Your DMARC Policy
Analyze DMARC reports to confirm correct authentication of legitimate emails. As confidence grows, gradually tighten your DMARC policy from “none” to “quarantine” or “reject” for messages failing authentication.
Understanding a DMARC record example
v=DMARC1; p=none; rua=mailto:[email protected]The provided DMARC record example consists of critical elements:
- “v=DMARC1” denotes the DMARC record and specifies its version.
- “p=none” indicates the DMARC policy set to “none,” allowing monitoring without impacting email delivery.
- “rua=mailto:[email protected]” specifies the email address to receive DMARC aggregate reports for analysis. If, you need a tool to read the reports, as it can hold a lot of data – in XML format! 😂
This DMARC record directs receiving email servers to authenticate messages using SPF and DKIM, sending the results back to the sending domain. The “none” policy type allows monitoring and analysis of email authentication without affecting delivery. As confidence in correct authentication grows, a transition to stricter policies like “quarantine” or “reject” can be made to safeguard against messages failing DMARC authentication.
I use reject on my own domain, as its have been validated over time and a setting I need on my domain.
MTA-STS
How MTA-STS works – Understanding the Basics
MTA-STS, or Mail Transfer Agent Strict Transport Security, is a security protocol empowering domain owners to mandate Transport Layer Security (TLS) encryption in email exchanges with other servers. Its primary goal is to thwart man-in-the-middle (MITM) attacks, bolstering email security. By compelling TLS encryption and upholding stringent security measures, MTA-STS safeguards against message interception, unauthorized access, and malicious content injection, preserving email privacy and integrity.
This protocol ensures encrypted, secure email transmission, effectively reducing the likelihood of breaches. Encouraging valid TLS certificates further enhances a domain’s credibility.
Benefits of MTA-STS implementation include:
- Protection from Interception: Mitigates man-in-the-middle attacks, preserving communication confidentiality and integrity.
- TLS Encryption Enforcement: Ensures essential encryption, safeguarding sensitive information from unauthorized access.
- Industry Compliance: Aligns with email security standards, aiding compliance with industry regulations and best practices.
- Enhanced Deliverability: Improves email delivery rates by decreasing message rejection or spam marking.
- Ease of Implementation: Relatively simple to implement and configure, especially for domain owners familiar with managing DNS records.
The RFC standard is here: RFC 8461 – SMTP MTA Strict Transport Security (MTA-STS) (ietf.org)
How MTA-STS work
MTA-STS simplifies email security by requiring a domain to add a specific DNS record, guiding remote mail servers on email transmission. The domain’s MTA-STS policy can be:
- “None”: Indicates no MTA-STS support, relying on standard SMTP protocols.
- “Testing”: Signals testing of a new policy without strict compliance requirements.
- “Enforce”: Confirms successful MTA-STS implementation, enforcing secure email connections.
When a remote mail server sends an email, it checks if the recipient domain has an MTA-STS record. If found, the server follows the domain’s policy. “None” or “testing” policies operate via standard SMTP. However, with “enforce,” the server verifies the sender’s valid TLS certificate. If invalid, an error message halts transmission.
Key Points:
- TLS Encryption: MTA-STS mandates TLS support for both sender and receiver servers. Failure to support TLS results in non-delivery.
TLS, an Internet Engineering Task Force (IETF) standard, encrypts messages exchanged between email servers. For successful email delivery under MTA-STS, both the sender and recipient mail servers must be compatible with TLS encryption.
- Certificate Validation: Validates sender’s certificate against published MTA-STS policy. Mismatch or absence rejects the email.
MTA-STS employs certificate validation as its second mechanism. Upon receiving a message, an email server verifies the sender’s MTA-STS policy through DNS. Subsequently, it compares the server’s certificate to this policy. If there’s a mismatch or the policy isn’t published, the email gets rejected.
Setup MTA-STS
Setting up MTA-STS involves these steps:
- Generate TLS Certificate: Obtain a TLS certificate for your email domain. You can acquire one from a reputable certificate authority (CA) or use a free certificate like Let’s Encrypt.
But most importent – its need to be hostes and realisable from the public. - Create MTA-STS Policy File: Develop an “mta-sts.txt” file outlining your MTA-STS policy. Host this file on your domain’s web server in the path: mta-sts.yourdomain.com/.well-known/mta-sts.txt.
- Publish MTA-STS Policy: Add a TXT record named “_mta-sts” to your domain’s DNS server. This record should contain the URL directing to your policy file.
- Test MTA-STS Policy: Verify your MTA-STS policy using an online testing tool to ensure accurate enforcement.
- Monitor MTA-STS Logs: Keep track of logs to confirm policy enforcement and troubleshoot any arising issues.
You can also create the file i a subdomain like this, and just need to put the “v=STSv1” and the ID in your _mta-sts TXT record. But do what there works best for you 😉

For Microsoft 365, enable MTA-STS with ease using these commands:
# Connect to Exchange Online
Connect-ExchangeOnline

# Retrieve transport rules
Get-transportRule

# Enable MTA-STS
Enable-TransportRuleTransportRule <rule name> -RequireTLS $true -EnableSecureTransport $true
These actions streamline the setup of MTA-STS, ensuring secure email transmission within your domain.
To vertify your setup too – you can test it with a tool like this: MTA-STS validator – Mailhardener tools
Read more here
Set up SPF to help prevent spoofing | Microsoft Learn
How to use DKIM for email in your custom domain | Microsoft Learn
Email authentication in Microsoft 365 | Microsoft Learn
How to use DKIM for email in your custom domain | Microsoft Learn
Use DMARC to validate email, setup steps | Microsoft Learn
dmarc.org – Domain Message Authentication Reporting & Conformance
Conclusion
In summary, configuring email authentication for your domains in etc. Exchange Online is essential for improving email deliverability, enhancing security, protecting your brand reputation, and ensuring compliance with various regulations. By implementing SPF, DKIM, DMARC, and MTA-STS, you can create a robust email security posture that safeguards your organization and its communication channels when its being checked on the other ends where you send emails to – like customers or partners!
I have the setup in place private, as im working in Security and see this for my personal brand a need.
In these days security officers and companyes are struggling securing the e-mail and prevent that snooping or MTM (Man in The Middle) attacks happens. There are various protocols available to secure your e-mail/domain – use them!
Thank you for taking the time to visit my blog. Kindly share it with others if you find it helpful for them! 😉🔐👍
Stay tuned for the new post about something cool! 🥳