Last Updated on May 1, 2024 by Michael Morten Sonne
Table of Contents
- Intoduction
- How to install
- Conclusion
- References
Intoduction
This blog covers what is Defender for Identity and how to install it – not fully configuration!
What is Defender for Identity
Microsoft Defender for Identity is a cloud-based security solution designed to enhance the monitoring of identities across your organization.
Fully integrated with Microsoft Defender XDR, Defender for Identity utilizes signals from both on-premises Active Directory and cloud identities. This integration aids in the improved identification, detection, and investigation of advanced threats targeting your organization 🤓
Deploying Defender for Identity enables your SecOp teams to provide a modern identity threat detection (ITDR) solution across hybrid environments. This includes:
- Proactively preventing breaches through the use of identity security posture assessments.
- Detecting threats in real-time through analytics and data intelligence.
- Investigating suspicious activities with clear and actionable incident information.
- Responding to attacks by employing automatic responses to compromised identities.
Formerly known as Azure Advanced Threat Protection (Azure ATP), Defender for Identity offers a comprehensive approach to securing identities in today’s dynamic threat landscape.
What can it do – or help you with
Comprehensive Identity Protection: Defender for Identity serves as a robust shield for user identities, significantly minimizing the attack surface within your organization. By providing crucial insights into identity configurations and recommending security best practices, it plays a pivotal role in fortifying your defenses against potential compromises to user credentials and thwarting advanced attacks.
Proactive Identity Posture Assessment: Gain a clear perspective on your organization’s identity security posture with Defender for Identity. This proactive assessment empowers you to identify and resolve security issues before they become exploitable by potential attackers. The Lateral Movement Paths feature ensures a swift understanding of potential attacker movements within your organizational network.
Insights and Security Assessments: Uncover potential risks to sensitive accounts with the Lateral Movement Paths feature, which reveals how attackers could compromise vital assets. Additionally, leverage security assessments available through Microsoft Secure Score to enhance your organizational security posture and refine policies for better protection.
Threat Detection Across Modern Identity Environments: In the complex landscape of modern identity environments, Defender for Identity seamlessly monitors data from both on-premises and cloud sources. This includes vigilant tracking of domain controllers, Active Directory Federation Services (AD FS), and Active Directory Certificate Services (AD CS), ensuring a comprehensive view of your identity environment.
Identification of Suspicious Activities Along the Cyber-Attack Kill Chain: Defender for Identity excels in identifying threats at various stages of the cyber-attack kill chain. From recognizing rogue users engaged in reconnaissance to detecting attempts to compromise user credentials and flagging lateral movements within the network, it provides a multi-layered defense strategy. Furthermore, in the event of an attacker achieving domain dominance, Defender for Identity highlights such behavior, allowing for prompt response.
Streamlined Investigation of Alerts and User Activities: Experience a reduction in alert noise as Defender for Identity prioritizes relevant security alerts, offering a real-time organizational attack timeline for seamless investigation. Its integration with Microsoft Defender XDR enhances the investigative process by correlating data across users, devices, and network resources, providing greater visibility and accuracy – I love this part! 😁
Defender for Identity is a comprehensive solution that not only prevents attacks at various stages but also streamlines the investigation process for a more effective response to security incidents within your organization.
What is the architecture
Microsoft Defender for Identity actively monitors your domain controllers by capturing and parsing network traffic, utilizing Windows events (many of them 🤣) directly sourced from here. It subsequently analyzes the gathered data to identify and respond to potential attacks and threats.
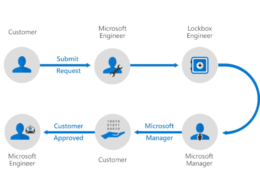
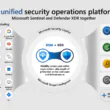
The accompanying image illustrates the layered integration of Defender for Identity with Microsoft Defender XDR. It functions collaboratively with various Microsoft services and third-party identity providers to diligently monitor incoming traffic from both domain controllers and Active Directory services.
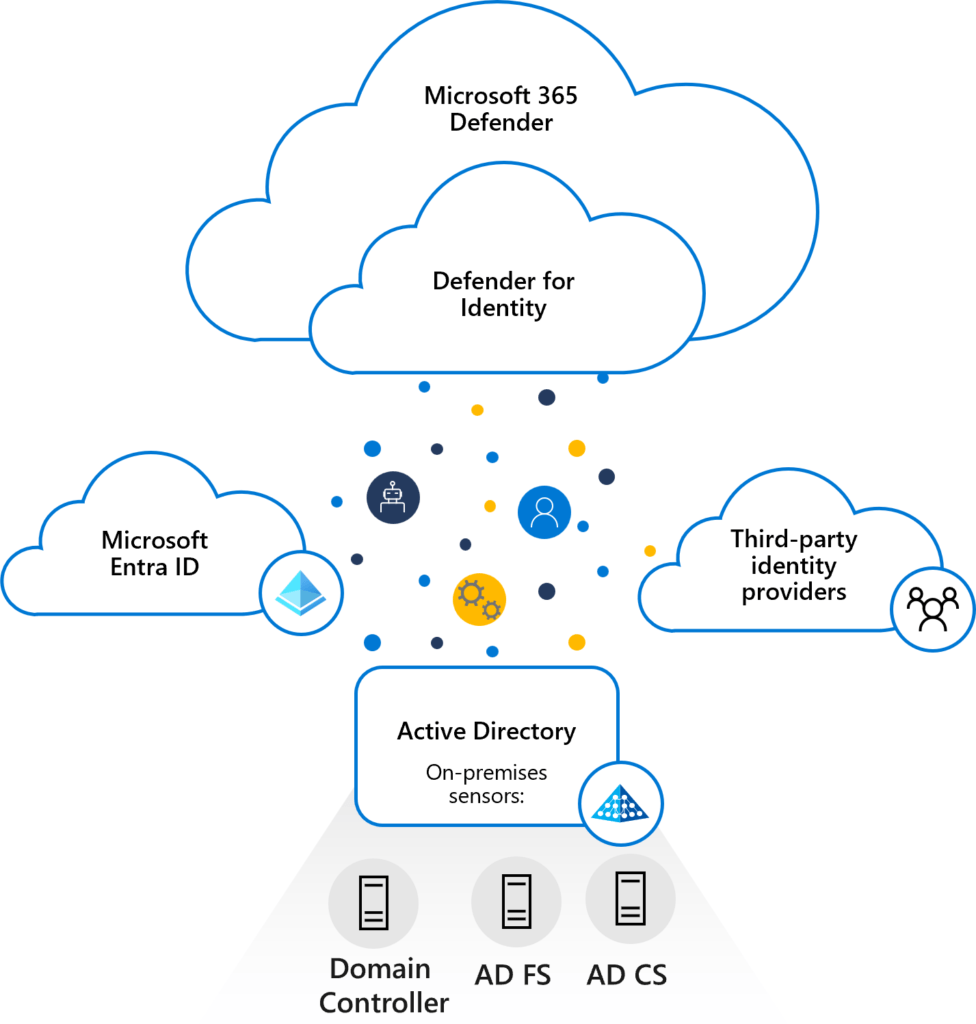
Directly installed on your Domain Controller (AD DC), Active Directory Federation Services (AD FS), or Active Directory Certificate Services (AD CS) server(s), the Defender for Identity sensor gains access to the necessary event logs directly from these servers. Following the parsing of both logs and network traffic by the sensor, Defender for Identity selectively transmits only the parsed information to the Defender for Identity cloud service.
Defender for Identity components
The solution is build on 3 parts – and that is:
Microsoft Defender Portal: The Microsoft Defender portal serves as the hub for your Defender for Identity workspace. It not only establishes your workspace but also showcases data received from Defender for Identity sensors. This portal empowers you to monitor, manage, and investigate threats within your network environment.
If no sensor is installed on your Defender for Identity workspace within 60 days, the workspace may be deleted and you’ll need to recreate it!
Defender for Identity Sensor: Defender for Identity sensors are installable directly on specific servers, including:
- Domain Controllers: These sensors monitor domain controller traffic without requiring a dedicated server or the configuration of port mirroring.
- AD FS / AD CS: Sensors on these servers directly monitor network traffic and authentication events.
Defender for Identity Cloud Service: The Defender for Identity cloud service operates on Azure infrastructure and is currently deployed in the US, Europe, Australia East, and Asia. This service is intricately connected to Microsoft’s intelligent security graph, ensuring comprehensive coverage and effective threat detection.
How to install
See also scripts at public/PowerShell/Microsoft Defender for Identity/DeployMDI at main · michaelmsonne/public (github.com)
Prerequisites
Licensing
Before starting, ensure that you have access to Microsoft Defender XDR, preferably as a Security administrator, and possess one of the following licenses:
- Enterprise Mobility + Security E5 (EMS E5/A5)
- Microsoft 365 E5 (Microsoft E5/A5/G5)
- Microsoft 365 E5/A5/G5 Security
- A standalone Defender for Identity license
Obtain licenses either directly through the Microsoft 365 portal or utilize the Cloud Solution Partner (CSP) licensing model.
Remember that licensing is based on users. Defender for Identity follows the same user-based licensing model as the other Microsoft 365 services and so, calculated according to Entra ID users.
For additional details, refer to the Licensing and Privacy FAQs.
Get a 3 months trial
You can get a 3 months trial free via this link, so you can play around with Defender for Identity in your enviroment: Microsoft Defender for Identity Trial
Permissions
To create your Defender for Identity workspace, you must have a Microsoft Entra ID tenant that includes at least one Security administrator.
Global Administrators and Security Administrators have access default and is an Defender for Identity administrator.
Ensure that you have Security administrator access in your tenant to enter the Identity section within the Microsoft Defender XDR Settings area and initiate the workspace creation.
Fun fact:
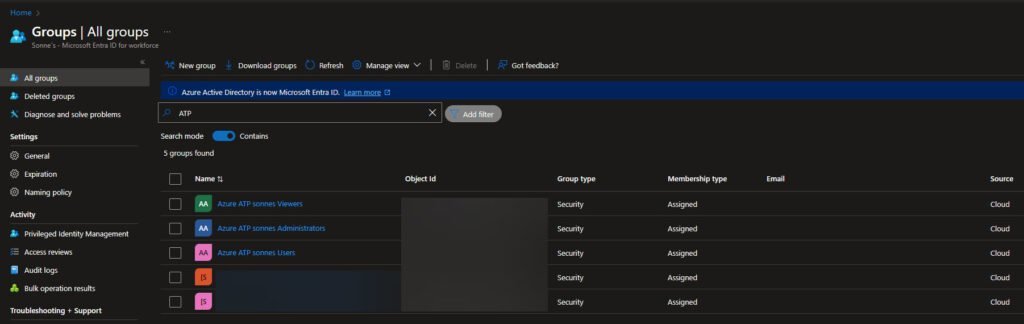
The role names (groups) is from the “old” days: Azure ATP <workspace name> Administrators, Azure ATP <workspace name> Users and Azure ATP (Workspace name) Viewers
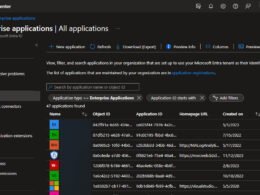
You can see this is groups there is created in Groups – Microsoft Entra admin center
We hope that is being renamed – only this, and NOT more products 😉😄
For additional details, refer to the Microsoft Defender for Identity role groups.
It´s strongly advise employing at least one Directory Service account with read access to all objects in the monitored domains.
Directory Service Accounts
Defender for Identity supports two types of Directory Service accounts (gMSA and regular user account). It is strongly recommended to opt for the more secure Group Managed Service Account in your environment! 🪪
| Option | Description |
|---|---|
| Group Managed Service Account gMSA (Recommended) | Enhances security and password management by having Active Directory handle the creation and rotation of the account’s password, similar to a computer account’s password. You have the flexibility to control the frequency of password changes for the account. |
| Regular user account | User-friendly for beginners and straightforward to set up. Read permissions between trusted forests are simpler to configure but entail additional overhead for password management. Opting for a regular user account is less secure. It necessitates the creation and manual management of passwords, posing a risk of downtime if the password expires and isn’t promptly updated for both the user and the DSA. |
There is more about granting and testing the accounts here: Directory Service Accounts for Microsoft Defender for Identity – Microsoft Defender for Identity | Microsoft Learn
From here, there is script to it also – see: public/PowerShell/Microsoft Defender for Identity/DeployMDI at main · michaelmsonne/public (github.com)
Minimum operating system requirements
Defender for Identity sensors can be installed on the following operating systems:
- Windows Server 2016
- Windows Server 2019 (Requires KB4487044 or a newer cumulative update. Sensors installed on Server 2019 without this update will be automatically stopped if the ntdsai.dll file version found in the system directory is older than 10.0.17763.316)
- Windows Server 2022
For all operating systems:
- Both servers with desktop experience and server cores are supported.
- Nano servers are not supported.
- Installations are supported for domain controllers, AD FS, and AD CS servers (this is new as Dec 2023 with Defender for Identity release 2.224!).
Sensor requirements and recommendations
The table below provides a summary of requirements and recommendations for the installation of the Defender for Identity sensor on the domain controller, AD FS, or AD CS server.
| Prerequisite / Recommendation | Description |
|---|---|
| Specifications | Make sure to install Defender for Identity on Windows version 2016 or higher, on a domain controller server with a minimum of: – 2 cores – 6 GB of RAM – 6 GB of disk space required, 10 GB recommended, including space for Defender for Identity binaries and logs Defender for Identity supports read-only domain controllers (RODC). |
| Performance | For optimal performance, set the Power Option of the machine running the Defender for Identity sensor to High Performance. |
| Maintenance window | We recommend scheduling a maintenance window for your domain controllers, as a restart might be required if the installation runs and a restart is already pending, or if .NET Framework needs to be installed. If .NET Framework version 4.7 or later isn’t already found on the system, .NET Framework version 4.7 is installed, and may require a restart. |
Connectivity requirements
The Defender for Identity sensor must communicate with the cloud service using one of the following methods:
- Proxy Setup (Read more here):
- Use if you have a forward proxy.
- Configure the proxy later in deployment.
- Silent Installation with Proxy (Read more here):
- Efficient deployment with pre-configured proxy settings.
- ExpressRoute (Read more here):
- Configure ExpressRoute for sensor traffic forwarding.
- Firewall with Azure IP Addresses:
- Configure firewall with MDI cloud service IP addresses (use the AzureAdvancedThreatProtection service tag).
- Monitor Azure IP address list for changes.
Verify that the servers you intend to install the Defender for Identity sensors on can reach the Defender for Identity cloud service. From each server, try accessing: https://*your-workspace-name*sensorapi.atp.azure.com.
To get your workspace name, see the About page in the Microsoft Defender Portal.
Im not so good to advanced networking, so I keep this to the level here – there is more you can read in the links 😉
Required ports
| Protocol | Transport | Port | From | To |
|---|---|---|---|---|
| Internet ports | ||||
| SSL (*.atp.azure.com) Alternately, configure access through a proxy. | TCP | 443 | Defender for Identity sensor | Defender for Identity cloud service |
| Internal ports | ||||
| DNS | TCP and UDP | 53 | Defender for Identity sensor | DNS Servers |
| Netlogon (SMB, CIFS, SAM-R) | TCP/UDP | 445 | Defender for Identity sensor | All devices on the network |
| RADIUS | UDP | 1813 | RADIUS | Defender for Identity sensor |
| Localhost ports: Required for the sensor service updater By default, localhost to localhost traffic is allowed unless a custom firewall policy blocks it. | ||||
| SSL | TCP | 444 | Sensor service | Sensor updater service |
| Network Name Resolution (NNR) ports To resolve IP addresses to computer names, we recommend opening all ports listed. However, only one port is required. | ||||
| NTLM over RPC | TCP | Port 135 | Defender for Identity sensor | All devices on network |
| NetBIOS | UDP | 137 | Defender for Identity sensor | All devices on network |
| RDP Only the first packet of Client hello queries the DNS server using reverse DNS lookup of the IP address (UDP 53) | TCP | 3389 | Defender for Identity sensor | All devices on network |
Time synchronization
The servers and domain controllers onto which the sensor is installed must have time synchronized to within five minutes of each other – but I hop not you have so much! 😲
Test your prerequisites
PowerShell Module
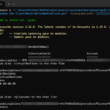
New from Jan. 2024: DefenderForIdentity PowerShell Module released – see reference documentation here (I recommend this!)
To install the PowerShell Module, run this PowerShell Command:
Install-Module DefenderForIdentityTo test your setup for the configuration and what you need to correct if any, run the following PowerShell Command:
New-MDIConfigurationReport -Path C:\Temp -OpenHtmlReport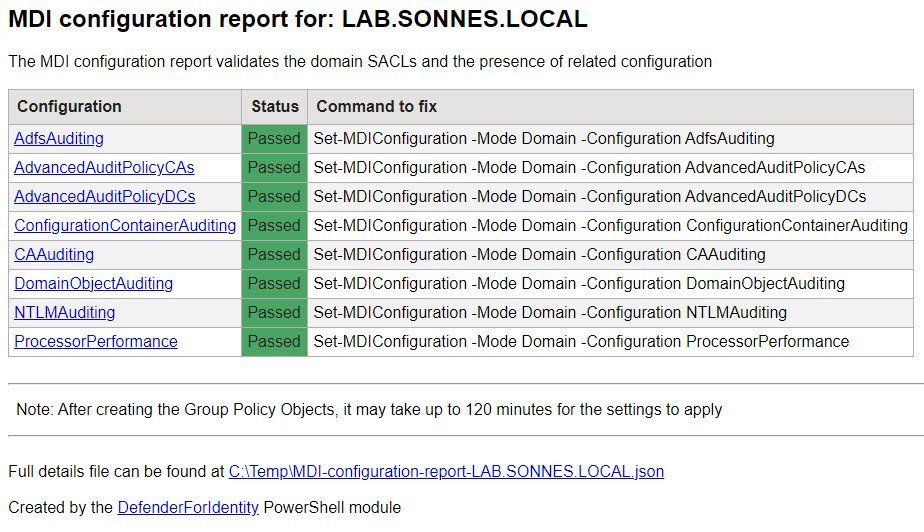
To see if your enviroment is ready or not, just run this small PowerShell Command and you get the answer – so nice – no manual tasks and debuggning anymore! 🎉
Test-MDIConfiguration -Mode Domain -Configuration All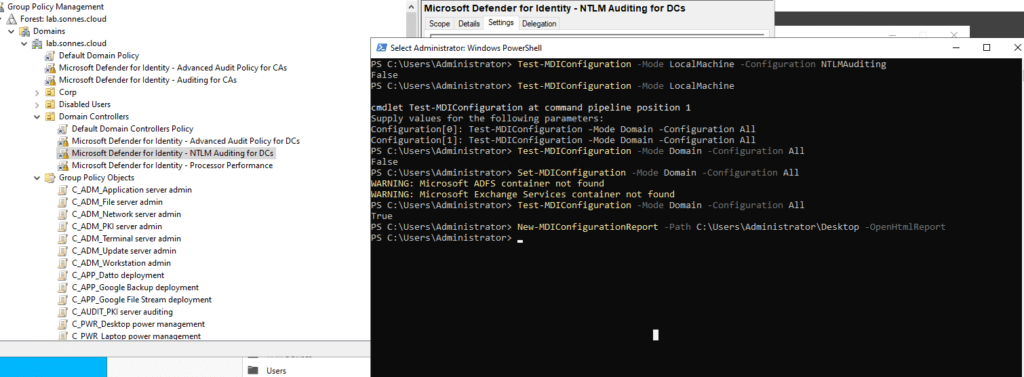
PowerShell Script (old)
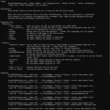
Microsoft is recommend running the Test-MdiReadiness.ps1 script to test and see if your environment has the necessary prerequisites.
The link to the Test-MdiReadiness.ps1 script is also available from Microsoft Defender XDR, on the Identities > Tools page (Preview).
Create Service Account
For all and script for this part, see the part: Use my PowerShell scripts (all needed)
Create a KDS root key
A KDS root key must be created if not exist in your domain. If the KDS root key already exists, no additional steps are necessary. To check this, run the following PowerShell Command:
Get-KdsRootKeyThe KDS root key is employed to generate passwords for Managed Service Accounts in Active Directory.
In the absence of a KDS root key, it is necessary to wait for 10 hours before creating the gMSA account (by design..)
Validation of the root key can be done using the following PowerShell Command:
Get-KDSRootKey / Get-KDSConfigurationTo create the a new root key, use the following PowerShell Command:
Add-KdsRootKey –EffectiveTime ((get-date).addhours(-10))This is because 10 hours is the default time to wait for it to be available – we skip that limit here, and you can now create the gMSA account needed 🫡
Read more here if needed: Create the Key Distribution Services KDS Root Key | Microsoft Learn
Create gMSA service account
To use the gMSA account, all domain controllers/servers with the sensor installed must have managed password permission/correct rights on the gMSA account in your Active Directory. This permission can be established using a custom group, individual entries, or the default Domain Controller group. To grant access, the PrincipalsAllowedToRetrieveManagedPassword property on the gMSA is required to set. This ensures that all Domain Controllers/servers with the sensor installed can retrieve the password for the account.
The service named Azure Advanced Threat Protection Sensor (yes, again the old name 🤣) operates as LocalService. In certain cases, when configuring the Log on as a service policy, it is necessary to include the gMSA account in the list of accounts authorized to log on as a service. This requirement is applicable only to Domain Controllers.
Create the gMSA account with the following PowerShell command:
New-ADServiceAccount -Name gMSAMDI -DNSHostName gMSAMDI.lab.sonnes.cloud –Description "Microsoft Defender for Identity service account" –KerberosEncryptionType AES256 –ManagedPasswordIntervalInDays 30You can add -DNSHostName gMSAMDI.lab.sonnes.cloud too – but not recommenced!
To see if the gMSA account is created syccesfully, run this PowerShell command:
Get-ADServiceAccount gMSAMDI -Properties * | fl DNSHostName, SamAccountName, KerberosEncryptionType, ManagedPasswordIntervalInDays, PrincipalsAllowedToRetrieveManagedPassword
To test and validate of whether the server have the necessary permissions to retrieve the gMSA password, we can confirm this using the following PowerShell command:
Test-ADServiceAccount -Identity gMSAMDIThe output here should say: Success
Now you are ready to go! 🎉
Bonus info: I will at some point when I had all done, share a GUI tool to share with you if you feel better that way 😉
Read more here about the account and settings needed too: Directory Service Accounts for Microsoft Defender for Identity – Microsoft Defender for Identity | Microsoft Learn
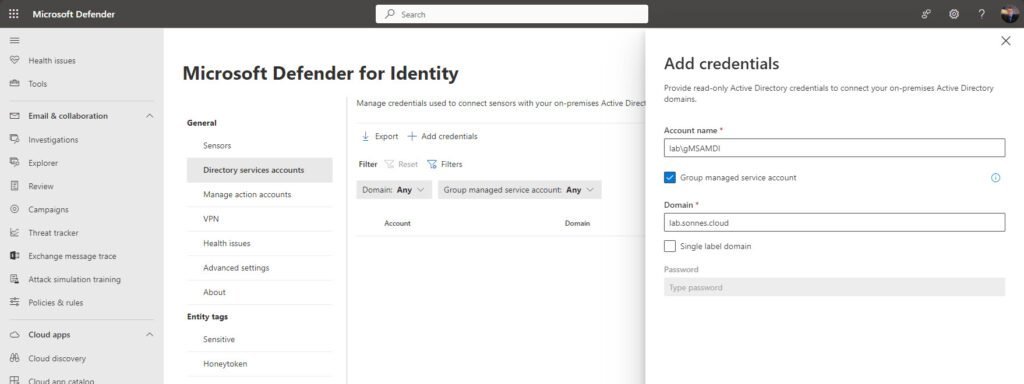
Add your Directory Service Account in the Microsoft 365 Defender portal
To establish a connection between your sensors and Active Directory domains, it is necessary to configure the Directory Service account in the Microsoft 365 Defender portal.
You have the option to utilize either a Group Managed Service account (gMSA) (Recommended) or a conventional Active Directory service account. In this example, we will adding a gMSA account. The steps for adding a employ a standard read-only AD service account are identical to the instructions provided below.
Go to Identities Settings – Microsoft Defender > Settings > Identities > under General click on Directory service accounts then Add credentials.
Install the Microsoft Defender for Identity sensor
This procedure showing the installation of the Defender for Identity sensor on a Windows server version 2016 or higher. Ensure that your server meets the minimum system requirements.
Download the Defender for Identity sensor
To download the Defender for Identity sensor from the Microsoft Defender portal do this:
- Open your Microsoft Defender portal.
- Go to Settings -> Identities -> Sensors -> Add sensor and copy the Access key value, which you’ll need for the installation.
A direct link to the page is here: Identities Settings – Sensors – Microsoft Defender
You only need to download the installer once, as it can be used for every server in the tenant. Make sure that no pop-up blocker is blocking the download.
The access key is only required during the sensor installation and can be regenerated without any impact. After completing the sensor onboarding, it is advisable to reset the access key by clicking Regenerate key.
Now, you can downloaded the “Azure ATP Sensor setup.exe” to install the sensor on the Domain Controller. MDI need the .NET Framework 4.7 or later (I hope this will be updated in the future 😉).
In cases where .NET Framework 4.7 is not installed, it will be included in the installation process, potentially prompting a reboot.
For Defender for Identity, the Npcap driver is a requirement too. For new installations, Npcap is automatically included in the installation package.
Install the sensor using the UI
From the domain controller, run the installer you’d downloaded from Microsoft Defender XDR and follow the instructions on the screen as listed here:
- Verify the machine has connectivity to the relevant Defender for Identity cloud service endpoint(s).
- Extract the installation files from the zip file. Installing directly from the zip file fails.
- Run Azure ATP sensor setup.exe with elevated privileges (Run as administrator) and follow the setup wizard.
- On the Welcome page, select your language and select Next. For example:
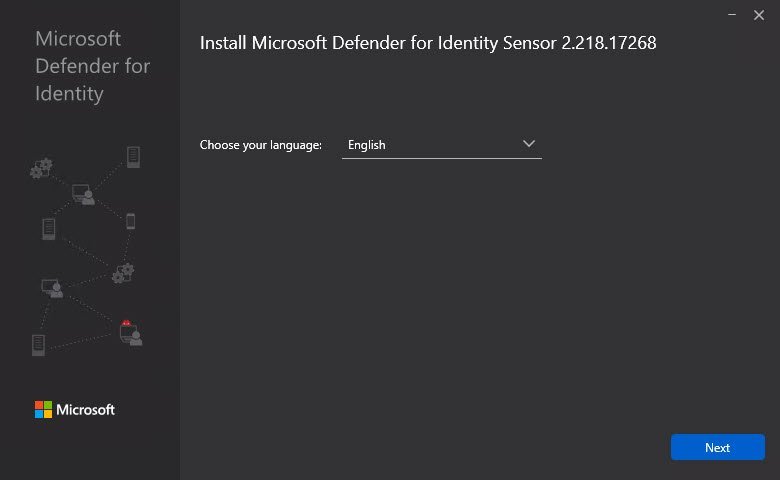
The installation wizard automatically checks if the server is a Domain Controller, AD FS server, AC CS server, or a dedicated server.
- If it’s a Domain Controller / AD FS server / AD CS server, the Defender for Identity sensor is installed.
- If it’s a dedicated server, the Defender for Identity standalone sensor is installed.
For example, for a Defender for Identity sensor, the following screen is displayed to let you know that a Defender for Identity sensor is installed on your dedicated server:
- Select Next.
A warning is issued if the domain controller / AD FS server / AD CS or dedicated server doesn’t meet the minimum hardware requirements for the installation.The warning doesn’t prevent you from selecting Next and proceeding with the installation, which might still be the right option. For example, you need less room for data storage when installing a small lab test environment.
For production environments, I highly recommend working with Defender for Identity’s capacity planning guide to make sure your domain controllers or dedicated servers meet the necessary requirements for best use and performance!
- On the Configure the sensor screen, enter the installation path and the setup package access key. For example:
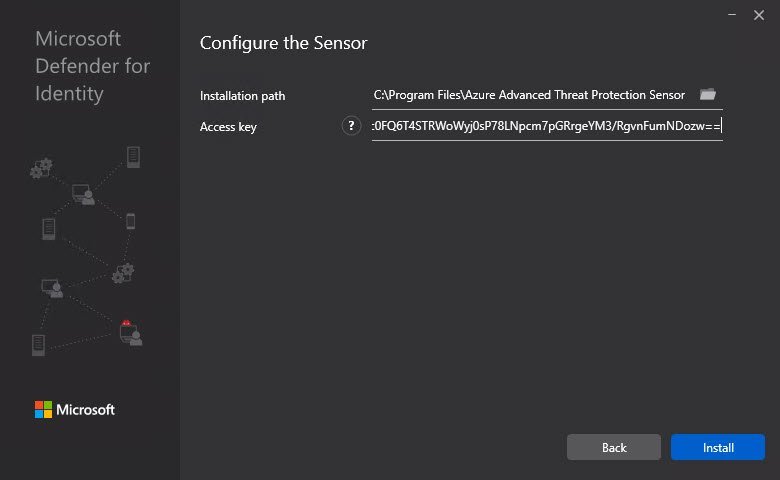
- Enter the following details:
- Installation path: The location where the Defender for Identity sensor is installed. By default the path is %programfiles%\Azure Advanced Threat Protection sensor. – Leave the default value.
- Access key: Retrieved from the Microsoft Defender portal in a previous step.
- Select Install. The following components are installed and configured during the installation of the Defender for Identity sensor:
- Defender for Identity sensor service and Defender for Identity sensor updater service
- Npcap OEM version 1.0
- Now select Install to start the installation of the Sensor and the installation will start:
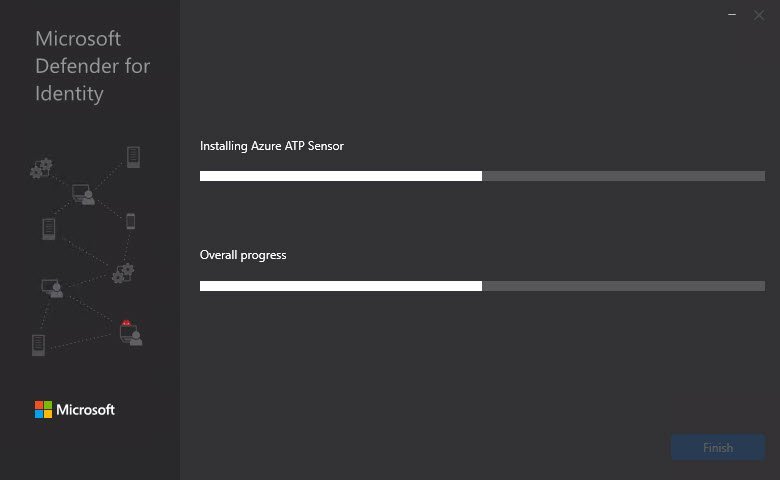
- If all going well, you will see a screen like this:
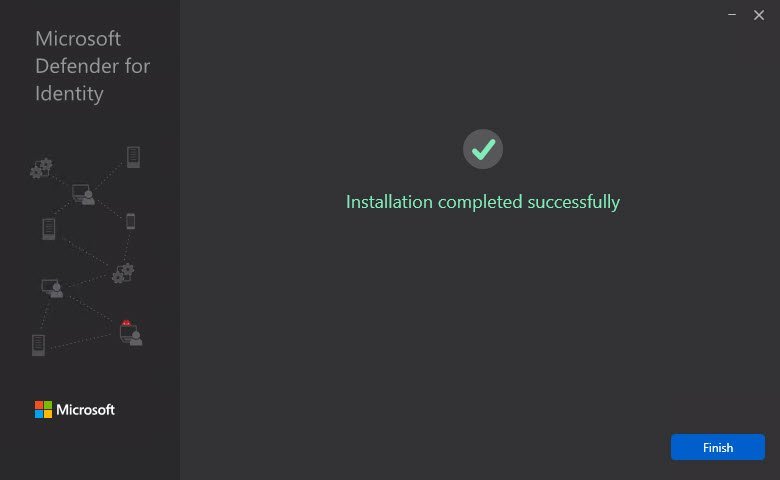
Open the services on the domain controller and verify that the MDI service is running:

Run a silent Sensor installation (via my script)
Use the following commands to perform a fully silent install of the Defender for Identity sensor, using the access key copied in the previous step.
To perform the silent installation via my PowerShell script, run this command is settings the needed information in console:
.\"Task1 - Install the Sensor.ps1"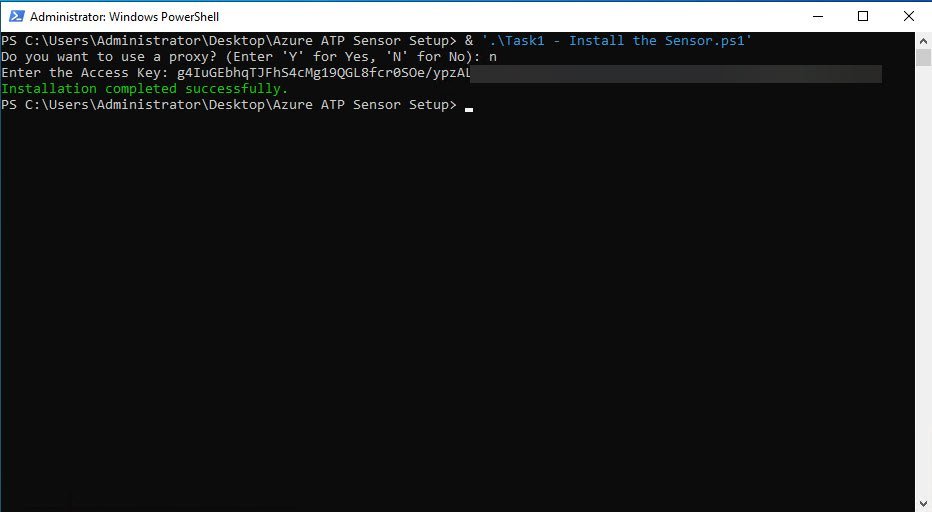
Or use the script provided there use arguments to perform the silent installation via my PowerShell script, run this command is settings the needed information in console:
.\"1 - Install the Sensor - arguments.ps1" -AccessKey 'YourAccessKey' -UseProxy -ProxyUrl 'YourProxyUrl' -ProxyUserName 'YourProxyUsername' -ProxyUserPassword 'YourProxyPassword'
Not the agent is installed (if not, the error code will be showed to you) – and it is now on the list of installed applications on the server 😉
A full list of the script is provide and is here: public/PowerShell/Microsoft Defender for Identity/DeployMDI at main · michaelmsonne/public (github.com)
Run a silent installation (manual)
Use the following commands to perform a fully silent install of the Defender for Identity sensor, using the access key copied in the previous step.
To perform the silent installation via PowerShell, run this command:
.\"Azure ATP sensor Setup.exe" /quiet NetFrameworkCommandLineArguments="/q" AccessKey="xxxxxxxxxxxxxxxxxxxxxxx"Here is an example:
.\"Azure ATP sensor Setup.exe" /quiet NetFrameworkCommandLineArguments="/q" AccessKeyFile="C:\Path\myAccessKey.txt"Use the following command to configure your proxy together with a silent installation:
.\"Azure ATP sensor Setup.exe" [/quiet] [/Help] [ProxyUrl="http://proxy.internal.com"] [ProxyUserName="domain\proxyuser"] [ProxyUserPassword="ProxyPassword"]`All the install paramenters can you find here: Install the sensor – Microsoft Defender for Identity | Microsoft Learn
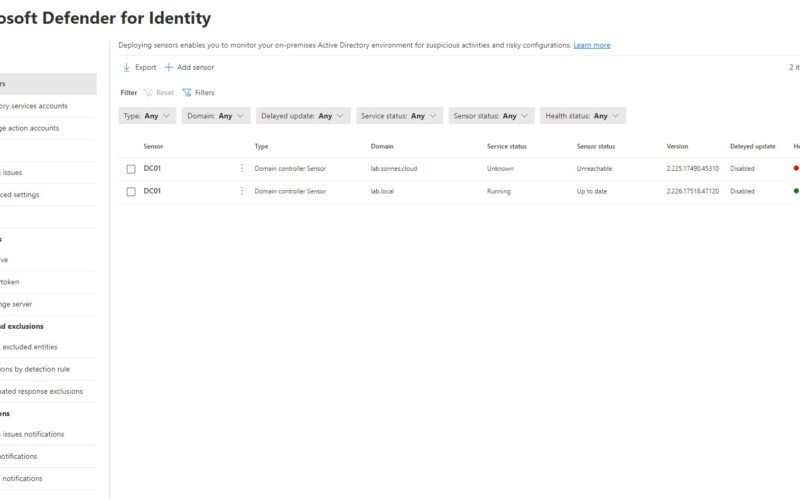
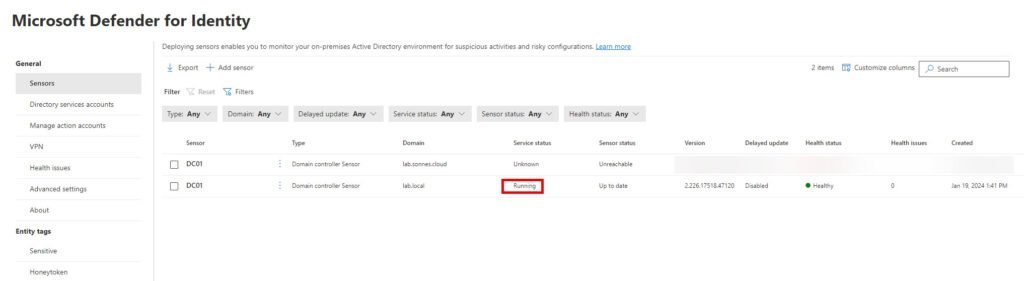
Validate Sensor is running and connected
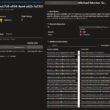
Navigate to the Identities Settings page in the Microsoft Defender portal and validate the sensor’s health. Examine both the service status and the overall health status:
Setup Audit policy and needed settings (GPOs)
For all and script for this part, see the part: Use my PowerShell scripts (all needed)
For the needed setup in your enviroment, you can now setup the needed GPO´s and so for your Domain Controllers – sensors en general.
Yes, you can use PowerShell! 🥳
Use my PowerShell scripts (all needed)
Utilize my PowerShell script(s) to seamlessly import Group Policy Objects (GPOs) with the correct audit policies and essential settings. This script streamlines the process, ensuring the accurate configuration of GPOs without the need for manual setup. Enhance the efficiency of your deployment by leveraging this automated solution for GPO importation.
Signed scripts with my code sign certificate exists is here if needed: public/PowerShell/Microsoft Defender for Identity/DeployMDI/Signed scripts at main · michaelmsonne/public (github.com)
To deploy and run the PowerShell scripts, follow these steps:
- Download the Scripts:
- Download the PowerShell scripts from here: public/PowerShell/Microsoft Defender for Identity/DeployMDI at main · michaelmsonne/public (github.com) (or see them on the Scripts tab)
- Prepare Your Environment:
- Verify that PowerShell execution policies allow script execution. You can use the following command in an elevated PowerShell session to set the execution policy:
Set-ExecutionPolicy RemoteSigned
- Verify that PowerShell execution policies allow script execution. You can use the following command in an elevated PowerShell session to set the execution policy:
- Run the Scripts:
- Open a PowerShell session and navigate to the directory where you saved the downloaded scripts.
- Execute each script by using the following command:
.\<ScriptName>.ps1
Replace “ScriptName.ps1” with the actual name of the script you want to run.
- Follow Script Instructions:
- Read and follow any instructions provided within each script. Some scripts may prompt you for input or require specific parameters.
- Review Output and Logs:
- After running the scripts, review the output for any errors or important messages. Check log files, if generated, for additional details.
- Testing and Validation:
- Test the changes in a non-production environment before applying them to a live environment.
- Validate that the intended configurations and settings have been applied successfully.
List of scripts (see scripts tab):
- ‘1 – Install the Sensor.ps1’ – set settings from console
- ‘1 – Install the Sensor – arguments.ps1’ – set settings by arguments
- ‘2 – Create Service Group and Account.ps1’
- ‘3 – Create Permission Group and assign gMSAAccount.ps1’
- ‘4 – Validate gMSA Account.ps1’
- ‘5 – Download and import GPOs.ps1’
Install the Sensor
Install the Sensor – arguments
Create Service Group and Account
Create Permission Group and assign gMSAAccount
Validate gMSA Account
Download and import GPOs
Use PowerShell Module (not all)
This is for GPO´s and so, NOT for installation of etc. sensors!
Configure and validate your Defender for Identity environment using PowerShell with ease. The new DefenderForIdentity PowerShell module is specifically crafted to assist you in configuring and validating your environment for seamless integration with Microsoft Defender for Identity.
By employing PowerShell commands, you can ensure accurate configurations and save time -thereby enhancing the efficiency of your operations.
To guide you through the utilization of these new PowerShell commands, I have incorporated the following procedures into the Defender for Identity list here:
- Modify proxy configuration through PowerShell.
- Employ PowerShell commands to configure, retrieve, and test audit policies.
- Generate a comprehensive report containing current configurations via PowerShell.
- Evaluate your DSA permissions and delegations using PowerShell.
- Validate service connectivity through PowerShell.
For further details and a comprehensive understanding, please refer to the following resources:
- DefenderForIdentity PowerShell module (PowerShell Gallery)
- DefenderForIdentity PowerShell reference documentation
Configuring Audit Policies Using Group Policy Objects (GPOs)
Take some time…
Implementing audit policies is crucial for maintaining the security and integrity of your Windows Server environment. By configuring the appropriate audit settings, you can track and monitor various activities, helping you detect and respond to potential security incidents.
What are Audit Policies?
Audit policies in Windows Server allow administrators to track specific events, such as logon attempts, file access, and system changes. Enabling and configuring audit policies provides valuable information for security monitoring, compliance, and troubleshooting.
Prerequisites:
Before configuring audit policies, ensure you have the necessary permissions and administrative access to manage Group Policy settings
Configuring Audit Policies with Group Policy
See needed settings in the part: Events needed to be setup for audit
- Open Group Policy Management Console (GPMC):
- Launch the GPMC on a Domain Controller or a computer with administrative access and the tools installed.
- Create or Select an Organizational Unit (OU):
- Identify the OU containing the computers or servers for which you want to configure audit policies. Create a new GPO or select an existing one.
- Edit the GPO:
- Right-click on the chosen GPO and select “Edit” to open the Group Policy Editor.
- Navigate to Audit Policy Settings:
- Expand the “Computer Configuration” section and navigate to “Windows Settings” > “Security Settings” > “Advanced Audit Policy Configuration” > “Audit Policies.”
- Configure Audit Policies:
- Enable and configure audit settings based on your requirements. Common settings include:
- Account Logon Events
- Account Management
- Logon Events
- Object Access
- Policy Change
- Privilege Use
- System Events
- Enable and configure audit settings based on your requirements. Common settings include:
- Apply the GPO:
- Close the Group Policy Editor and link the GPO to the desired OU’s for your Domain Controllers.
- Force Group Policy Update:
- On target computers, run
gpupdate /forcein a command prompt to apply the updated GPO immediately.
- On target computers, run
Events needed to be setup for audit
For the overall events needed to be audited and so, here have Microsoft the full and updated list:
We take the PowerShell way right – it´s faster too 😉
Conclusion
Deploying Microsoft Defender for Identity is a pivotal step towards fortifying the security posture of your organization’s identity infrastructure. This robust solution provides advanced threat protection, leveraging behavioral analytics and machine learning algorithms to detect and thwart cyber threats at various stages but also empowering organizations to proactively manage and enhance their overall security posture.
As technology and threat landscapes evolve, it’s crucial to stay informed about updates to Defender for Identity and emerging security challenges. Regularly reassess and adapt your security strategy to address new risks and maintain a proactive defense posture.
For you to setup most if it, use my provided PowerShell scripts – it will save you some time! 🙈🤣
And I enjoy contributing this content to the community, and here are some scripts for various tasks — even if they aren’t strictly necessary 🤣
In part 2 when I had done that, we look into the diffrent options Defender for Identity gives you 🫡
You can allways see what is new to Defender for Identity here: What’s new – Microsoft Defender for Identity | Microsoft Learn
Thank you for taking the time to visit my blog. Kindly share it with others if you find it helpful for them! 😉🔐👍
Stay tuned for the new post about something cool! 🥳
References
A full list of my script there is provide is here: public/PowerShell/Microsoft Defender for Identity/DeployMDI at main · michaelmsonne/public (github.com)
Microsoft: What is Microsoft Defender for Identity? – Microsoft Defender for Identity | Microsoft Learn
Microsoft: Monitored activities – Microsoft Defender for Identity | Microsoft Learn
Microsoft: Introducing the new PowerShell Module for Microsoft Defender for Identity
Microsoft: Event collection overview – Microsoft Defender for Identity | Microsoft Learn
Microsoft: Configure audit policies for Windows event logs – Microsoft Defender for Identity | Microsoft Learn